 |
 |
 |
|
 Register on the forum now to remove ALL ads + popups + get access to tons of hidden content for members only!
|
||||||||
|
||||||||
 Best Porn Sites Best Porn Sites
|
Live Sex | Register | FAQ | Members List | Calendar |
| Tutorials Step by step Guides and How to's with screengrabs. |
 |
|
|
Thread Tools | Display Modes |
 August 23rd, 2013, 12:19 PM
|
#11 |
|
Vintage Member

Join Date: Jun 2008
Location: Underground in the Mountains of Madness
Posts: 2,790
Thanks: 1,012
Thanked 97,001 Times in 2,804 Posts
  |
Flood Fill (or sometimes Auto-Fill), is a feature on photo editing tools that allows the user to block fill a segment of the picture being repaired with one selected colour. It can be used in picture repairs, to fix faded areas, or give an even tone to an area where its blotchy. It does however have some major limitations (see pitfalls section), and should always be used only when appropriate, and always in conjunction with the other methods described in the thread.
Sadly the 10 minute film links on methods died according to a mod edit, so you need to search for movies on how to clone, flood-fill and paint etc. Method: Tips
 In this example from earlier in the thread  The black background is discoloured / faded but after using Auto-fill its even across the page.  Pitfalls:
Last edited by VintageKell; August 31st, 2013 at 11:35 AM.. |

|

|
|
August 28th, 2013, 08:08 AM
|
#12 |
|
Vintage Member
Join Date: Jun 2008
Location: Underground in the Mountains of Madness
Posts: 2,790
Thanks: 1,012
Thanked 97,001 Times in 2,804 Posts
|
Last post from me in this thread concerns the Healing tool (or scratch repair tool), that later versions of the editing applications have. The GIMP application for example, which is linked to in the thread has a 'heal' function. These are very similar to the cloning tool, in that a selected area of the image is copied on to another area of the image, but the difference is that it attempts to blend in the repair by using information held in the surrrounding edge of the damaged section. This obviously has limitations, for example if the edge of the area to be repaired doesn't match what was in the damaged area.
1. Select the heal or repair option (two examples on image).  2. Use the tool to select the area with the scratch (choose a width that is about 3 or 4 pixels wider than the scratch or the repair loses details.), and let go of selection to try to erase it. The Scratch Remover tool uses the background image details at edge of selection to create new information to attempt to replace the scratch in the rest of the selected area. Tip: You should check results after each change because they can be imperfect, and touching up with the clone tool afterwards can improve the end results by making the repair/heal blend better. NB:
Personally I prefer the clone tool as I find it its easier to control, but for certain small repairs this tool is useful as it does the blending for you ..... Well good luck with repairing those battered polaroids of yesteryear and remember the main two tips;
Cheers VK Last edited by VintageKell; August 28th, 2013 at 10:16 AM.. |
|
|
|
|
April 12th, 2014, 09:09 AM
|
#13 |
|
Vintage Member
Join Date: Jun 2008
Location: Underground in the Mountains of Madness
Posts: 2,790
Thanks: 1,012
Thanked 97,001 Times in 2,804 Posts
|
A couple of joins .... various stages and sizes. As discussed earlier, those areas lost to magazine folds or just cut by editors have to have 'parts' inserted to replace them. All done using techniques described in earlier posts ... and utilising adjustment tools provided by professional photo editors.
Original Sized - Missing Parts Highlighted:   Original Sized - Missing Parts Filled and Enhanced Versions:     Resized - Missing Parts Filled and Enhanced Versions:     |
|
|
|
|
April 12th, 2014, 04:09 PM
|
#14 |
|
Vintage Member
Join Date: Jun 2008
Location: Underground in the Mountains of Madness
Posts: 2,790
Thanks: 1,012
Thanked 97,001 Times in 2,804 Posts
|
Here's a series of straightens, perspectives adjustments, fills, and colour enhancements - which show how the 3rd image and then the final image are obtained. Note there's not much I can do about the height perspective distortion, so its still a long body.
      Last edited by VintageKell; January 20th, 2015 at 09:41 PM.. Reason: btoken links |
|
|
|
|
April 25th, 2014, 11:34 AM
|
#15 | |
|
Vintage Member

Join Date: Jan 2008
Posts: 1,174
Thanks: 9,103
Thanked 68,462 Times in 1,177 Posts
|
Quote:
 Basically I copied parts of Linda's hair (and the border) and pasted them into position, then rotated the pasted parts to best fit them and then used masks to blend them with the original. Took roughly the same amount of time (using photoshop). Last edited by zorin; April 26th, 2014 at 04:38 PM.. Reason: text |
|
|
|
|
| The Following 4 Users Say Thank You to zorin For This Useful Post: |
|
May 1st, 2014, 10:58 AM
|
#16 |
|
paludicolous paravant

Join Date: Sep 2005
Location: Perfidious Albion
Posts: 26,742
Thanks: 75,696
Thanked 745,848 Times in 26,862 Posts
|
 I am wondering whether there is a way to repair images like this (I am not particularly interested in this image, this is just a typical example) with a photo-editor - short of doing it pixel by pixel [I use paintshop pro]. These kinds of stripey wavy lines are produced by scanners (especially some older ones), and I never had any luck when trying to get rid of them afterwards. When this happens in my own scans I simply do them again with increased resolution - 600 dpi usually does the trick, once I had to go to 1000dpi (outch!). But with other people's images found here and there that's not an option. |

|
|
| The Following 6 Users Say Thank You to beutelwolf For This Useful Post: |
|
May 1st, 2014, 10:35 PM
|
#17 | |
|
Vintage Member
Join Date: Jun 2008
Location: Underground in the Mountains of Madness
Posts: 2,790
Thanks: 1,012
Thanked 97,001 Times in 2,804 Posts
|
Quote:
There is a long winded method - LAYERS (which I am not expert in enough to really explain the use of as its too big a subject for this 'tip' thread, and partially as I am totally untrained myself and do it by trial and error, although I can make some use of them) ... there are web tutorials. I did these fairly quickly as its just an example but it still took a while.  or like this  But this is a lot of work, and each one is different (well for me). So in summary, no tool, just hard work. |
|
|
|
|
| The Following 5 Users Say Thank You to VintageKell For This Useful Post: |
|
May 2nd, 2014, 02:39 PM
|
#18 | |
|
Vintage Member
Join Date: Jan 2008
Posts: 1,174
Thanks: 9,103
Thanked 68,462 Times in 1,177 Posts
|
Quote:
The colour banding is basically a light interference problem. It can more clearly be seen when looking at the individual channels that make up the image : 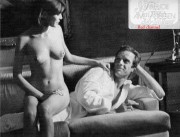  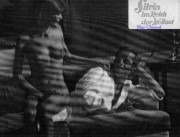 The effect is most visible in the blue channel and (though slightly less so) in the red channel. The green channel is the least affected. Note the difference in the pattern in the red and the blue channel. As VintageKell already pointed out it takes a lot of hard work in order to get rid of it. The (quick and dirty and incomplete) example below demonstrates a different technique than used by VintageKell above :  In order to reduce the visibility of the colour bands I turned to the dodge and burn tool (photoshop). These respectively brighten and darken the pixels of an image. Instead of using these tools on the image layer I used them on the red and blue channel separately (in the channels palette turn off all channels except the one you want to work on). Both tools were set to affect midtones only and an exposure of 20% for more control over the effect of the tool and using a very soft brush (0% hardness) for both tools. The edited red and blue channel look like this : 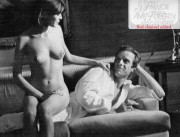 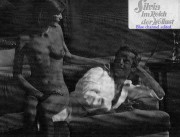 The result in the example above is only meant to demonstrate the effect of technique and is far from perfect since I only worked on the image for about 15 minutes (hence quick and dirty). Last edited by zorin; May 4th, 2014 at 01:43 PM.. Reason: added edited channel images |
|
|
|
|
| The Following 9 Users Say Thank You to zorin For This Useful Post: |
|
May 2nd, 2014, 07:18 PM
|
#19 |
|
Vintage Member
Join Date: Jun 2008
Location: Underground in the Mountains of Madness
Posts: 2,790
Thanks: 1,012
Thanked 97,001 Times in 2,804 Posts
|
Zorin's excellent post above exhibits far more technical knowledge about channels and layers etc, than I possess, and was the sort of help I hoping for when the thread was started .... for instance I didn't even know the issue beutelwolf was asking about was called 'colour banding'.
 My reference above to 'layers' was the fact that I know enough to be aware that the layers and similar adjustment techniques, are how all these issues are supposed to be corrected, but which I am largely ignorant of, as I have too little time to learn more ... And one look at the thread will show you that that's not too much more than cloning ... but I get by with that, a good eye for joins and a lot of patience. Zorin got his 'quick and dirty and incomplete' results in 15 minutes .... my 'quick' results were well over an hour of fiddling about and trial and error (hard work indeed!!) ... so its fairly obvious that his method of splitting the channels is the correct one, although there may be some more tweaks than that. .... So I don't touch these types of pictures often, and few of those have turned out as I would want ... yesterdays was opportunely, an exception that proves the rule. Extra Thought: While I was in the pub last night I thought about this issue and Zorins post, and had a question. Is it possible to replace the blue channel (in the example we are discussing), with one of the others ....renaming it 'blue' and changing it to blue? I am probably exposing myself to some ridicule with this question, but I was thinking that by adding the corrected version (perhaps as a .. 'layer' LOL), then that could perhaps correct the problem with no other intervention? However one poster on a website thread on this banding issue said "Sometimes, a little noise can help, but don't go above '6' generally. Other times you have to selectively blur and clone and heal and dodge and burn to remove it. Sometimes you have to do all of the above. If you can live without whatever you are doing to the file that is causing it, don't do it." .... which is pretty much back to my own 'hour of fiddling about and trial and error' .... ah well. Last edited by VintageKell; May 3rd, 2014 at 08:46 AM.. Reason: Added a thought |
|
|
|
| The Following 6 Users Say Thank You to VintageKell For This Useful Post: |
|
May 3rd, 2014, 08:43 AM
|
#20 |
|
Vintage Member
Join Date: Jun 2008
Location: Underground in the Mountains of Madness
Posts: 2,790
Thanks: 1,012
Thanked 97,001 Times in 2,804 Posts
|
And on another tack .... there are web links on the subject of banding ... some deal with gradient banding (including colours).
One here Another one here And especially Here This last has this advice .... 'Fading a single color to transparency will not yield pretty results. If you absolutely must fade a color to transparency, make sure the gradient is small, or that the range of color difference in the gradient is high. It’s the long and subtle gradients that cause problems.' ..... so you could try fading the bad band to 'transparency' 'Use Noise in Another Layer. If you absolutely need to maintain a lot of integrity in your photo, but still need to remove banding in some area, try adding the noise to its own layer.' .... which is mentioned on other sites. It goes on to add that to do this .... 1. Create a new layer and fill it with 50% grey. That’s about #808080 if you’re working in RGB. 2. Place this layer above the image you’re adding noise to. In the layers palette, choose ‘Overlay’ as the blending mode. 3. Add noise to this grey layer, 2-3% should suffice but you should look in the preview image before you commit anything. and that you’ll notice that the noise does not affect any very bright or dark areas of your image. Because the noise is in ‘Overlay’ mode, you’re free to crank up the noise as high as needed, without destroying the quality of your highlights or shadows. Another benefit to having the noise in its own layer is that you can use your eraser tool to remove noise from areas where it is not needed. You could even take one step further, creating a complex mask and applying it to the noise layer, giving you full control over which areas are affected. Finally: This last website link seems to have cracked it ..... I won't try to explain as its illustrated. Some food for thought .... Last edited by VintageKell; May 3rd, 2014 at 09:26 AM.. |
|
|
|
| The Following 5 Users Say Thank You to VintageKell For This Useful Post: |
|
|
|


 Linear Mode

