 |
 |
 |
|
 Register on the forum now to remove ALL ads + popups + get access to tons of hidden content for members only!
|
||||||||
|
||||||||
 Best Porn Sites Best Porn Sites
|
Live Sex | Register | FAQ | Members List | Calendar | Mark Forums Read |
 |
|
|
Thread Tools | Display Modes |
 December 15th, 2009, 04:39 AM
|
#51 |
|
Veteran Member

Join Date: Mar 2008
Location: Trapped inside a scanner
Posts: 3,502
Thanks: 4,331
Thanked 61,991 Times in 3,412 Posts
  |
Another thing I've learned, which may not be applicable to everyone, is that when scanning a page that has only one image on it, or when scanning a page with multiple images but you're only interested in one image, is to make sure the area you're scanning includes at least part of another image.
With my old scanner 10 years ago I found that if I used the marquee selection to restrict the scan to just the one image, the scan would sometimes come out worse than if I enlarged the marquee to include another image. Don't know why this was happening but it was definitely a factor in my scanning back then. I haven't seen it happen with the new scanner though so maybe the technololgy has improved on the low end of the scanner spectrum. |

|

|
|
December 16th, 2009, 05:30 AM
|
#52 |
|
Veteran Member
Join Date: Mar 2008
Location: Trapped inside a scanner
Posts: 3,502
Thanks: 4,331
Thanked 61,991 Times in 3,412 Posts
|
I forgot about this until tonight when I ran into this very issue but there's one other point on the subject of "black boxes" that should be made. Not all "black boxes" are there because someone blotted out text. Sometimes it's because one pic overlapped another in one spot and when the end product of your scanning output is supposed to be single images, as is the case for me and a lot of other scanners who don't want to go the "scan the whole page and everything on it as one lone image" route, you don't want a piece of another image there because that looks stupid. You really have no choice but to blot it out.
|
|
|
|
|
July 13th, 2010, 08:16 AM
|
#53 | |
|
Vintage Member
Join Date: Jul 2010
Posts: 823
Thanks: 20
Thanked 24,261 Times in 822 Posts
|
Quote:
Wow, I just came across this thread......I'm late to the discussion, but there are a few things I think I can add. Yes, you do have a choice besides just blotting it out, you can do a rebuild. That's where you rebuild the part of the picture where a second picture overlapped. I did that all the time in my scans. I will admit that sometimes, trying to rebuild the picture is too difficult. When that happens, then you can black box the picture, although what I'd do was to make a box around the section that I wanted to blot out, select a color that matched the scene, fill it with that color, then place the model's name in the colored box. If it was done right, it looked like part of the original picture.  |
|
|
|
|
| The Following User Says Thank You to Dekoda For This Useful Post: |
|
July 13th, 2010, 08:36 PM
|
#54 |
|
Veteran Member

Join Date: Dec 2007
Location: Germany
Posts: 382
Thanks: 1,522
Thanked 34,100 Times in 367 Posts
|
I know many words are said already about this topic but I thought about a new approach.
I thought if in mags some pages can be fixed very well using the standard auto-correction tools in e.g. PS it should be possible to find out what the program does and manually apply the same effects and thus getting the same results. But afterwards it sould be possible to reuse the filters I manually created for the pictures that do not work very well with auto color balance and stuff. And I might be able to re-use these filters for other mags aswell. So here are my settings and the results: (left pictures are totally untouched, the right ones have my filters applied)   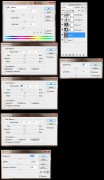 On *MY* monitor (a mid-end HP TFT) the pictures pretty much look like in the magazine, regarding contrast, colors and hue. I guess I overdid a little with yellow so you might wanna fix this.... As you can see in the settings screen I created adjustment layers, then added the picture itself below those. The purpose of the empty layer is that I can save the empty picture only consisting of adjustments as a psd-file. Tell me what you think  hartwig P.S: - In my opinion brightness and contrast are not that important, but fixing Exposure, Gamma and most of all Offset will do most of the job! - I disasseble the mags to avoid blurring at the edges and always try to fix double-pages... and like the results. - Pages are from CC 176 which I hope I can finish soon |
|
|
|
| The Following 4 Users Say Thank You to hartwig For This Useful Post: |
|
July 14th, 2010, 05:34 AM
|
#55 | |
|
Vintage Member
Join Date: Jul 2010
Posts: 823
Thanks: 20
Thanked 24,261 Times in 822 Posts
|
Quote:
Hartwig, I took the liberty of making a few adjustments to the original scan (the left side picture) in each of the two pictures. I see no reason to use gamma, exposure or offset to make adjustments to each scan, just a bit of saturation, contrast, and of course, the ROC filter which I use extensively. The thing is, everyone adjusts their scans differently, so what you might do, another person might not do. The finished scan is whatever looks good to the person who scanned the original picture. If you are happy with it, then that's all that matters. What looks good to one person, might look bad to another, so you have to make adjustments that look good to you. The adjustments I made don't mean that my end result looks better, it just means it looks different.   Last edited by Dekoda; July 14th, 2010 at 05:39 AM.. |
|
|
|
|
| The Following 5 Users Say Thank You to Dekoda For This Useful Post: |
|
July 14th, 2010, 12:42 PM
|
#56 |
|
Veteran Member
Join Date: Aug 2007
Posts: 566
Thanks: 192
Thanked 12,244 Times in 432 Posts
|
I think the pics made by Hartwig look better. Dekoda's pics have a strong white clippning specially pic2.
Here are my versions, made in PS4 with auto level. They have a little red color cast.   Tuffy |
|
|
|
|
July 14th, 2010, 01:57 PM
|
#57 |
|
Veteran

Join Date: Mar 2007
Posts: 3,531
Thanks: 11,945
Thanked 79,764 Times in 3,160 Posts
|
To paraphrase Dustin Hoffman. I just want to say one word to you. Just one word: curves!
Read and learn (and there are some other very useful bit sized tuts here too): http://www.cambridgeincolour.com/tut...hop-curves.htm Curves is the most powerful tool in PS at your disposal. It may take a lot of practise to learn how to use it properly and effectively, but it can do a hell of a lot more than color balance, brightness and contrast can together. I will use the latter tools after using curves for any very minor tweaks before final editing. Here's a WIP example (the raw scan is on the right).  I use the levels tool most times to improve the brightness of a scan, though beware of using it if you scanner can only produce 8-bit TIFF files as it may cause color banding. It works best with 16-bit TIFFs. Tip: always save your scans as TIFFs it's the best file quality, especially for color images. I'll only use hue and saturation when the image scanned has too much saturation of a particular color. Usually I find it's either red/magenta or yellow. I always work using the individual color channels, never the master channel: likewise when using the curves tool. I agree with what Dekoda has already said, if it looks good to you then it should look good to everyone else, unless their TFT is crap or the veiwer is color blind. Though if you're a profilic scanner (or artist, or photog too) and you have a pretty decent midrange or high end TFT it's worth buying a screen calibrator. The more accurate your screen's output is the less likely it may look crap on a different screen. And auto color is for amatuer holiday snaps (i.e. it's crap).  |
|
|
|
| The Following 5 Users Say Thank You to Darth Joules For This Useful Post: |
|
July 14th, 2010, 06:16 PM
|
#58 | |
|
Veteran Member
Join Date: Dec 2007
Location: Germany
Posts: 382
Thanks: 1,522
Thanked 34,100 Times in 367 Posts
|
Quote:
Tuffy said your pics have a little clipping (what did you mean, Tuffy?). The pics do not really look like in the magazine but I like your results. But what should you do? Keep it most original to the experience from the actual print or just make it the best you can? Cheers, hartwig |
|
|
|
|
| The Following User Says Thank You to hartwig For This Useful Post: |
|
July 14th, 2010, 08:26 PM
|
#59 | |
|
Vintage Member
Join Date: Jul 2010
Posts: 823
Thanks: 20
Thanked 24,261 Times in 822 Posts
|
Quote:
Oh, sorry Tuffy. I mentioned the ROC filter is another thread (Scanning and Editing Tips). The Kodak ROC filter is a plugin for Photoshop. I have an old version of it, and I use it at it's default settings. When you use it, a lot of times it will remove too much color and the picture will look bad. What I do is to use the filter, then use Photoshop's "Fade" function. I fade the effect to zero, then slowly move the slider up till I get the desired effect. I use the ROC filter first, before doing anything else. As for whether to keep the picture looking like it did in the magazine, I mentioned this in another thread also. This is strictly my opinion, but I feel as if you should make the picture look as good as possible. The reason is because the picture in the magazine is not what the actual photograph looks like. Plus, a lot of lower end magazines don't have good quality control standards, so if you were to buy the first issue of a magazine, the pictures wouldn't look the same as they do in the 50,000 issue of the magazine. Also keep in mind that most people don't calibrate their monitors. If you edit the picture on a calibrated monitor, and someone else views it on the exact same type of monitor, but it's not calibrated, it will look different. So I figure that I might as well try to make the picture look as good as I can get it since no matter what I do to it, it will look different to everyone. |
|
|
|
|
| The Following 5 Users Say Thank You to Dekoda For This Useful Post: |
|
July 14th, 2010, 08:52 PM
|
#60 | |
|
Veteran Member
Join Date: Aug 2007
Posts: 566
Thanks: 192
Thanked 12,244 Times in 432 Posts
|
Quote:
 When I made the pictures with auto level, I wanted to show that even auto level works without clipping in this case. @Darth Joules I have worked with Photoshop since Photoshop 3. I know Levels and Curves very well, I don't need read and learn! Tuffy |
|
|
|
|
|
| Thread Tools | |
| Display Modes | |
|
|


 Linear Mode

