 |
 |
 |
|
 Register on the forum now to remove ALL ads + popups + get access to tons of hidden content for members only!
|
||||||||
|
||||||||
 Best Porn Sites Best Porn Sites
|
Live Sex | Register | FAQ | Members List | Calendar |
| Tutorials Step by step Guides and How to's with screengrabs. |
 |
|
|
Thread Tools | Display Modes |
 May 3rd, 2014, 10:24 PM
|
#21 | |
|
Vintage Member

Join Date: Jan 2008
Posts: 1,174
Thanks: 9,103
Thanked 68,462 Times in 1,177 Posts
  |
Quote:
The channels in an image file each hold (greyscale!) image data for one of the colour channels (primary colours in case of RGB) which make up the total image. No I'm not kidding, a colour image file actually only contains greyscale data. The actual colour image is created by the graphics card in your pc and the monitor attached to it. As an experiment I tried something similar in photoshop though instead of copying one of the other channels I tried to replace the original blue channel data with the edited copy of the original blue channel. Photoshop threw me into CMYK mode with an image containing only two channels which looked absolutely awful and which I threw away as quick as I could in order to prevent permanent damage to my eyes. As far as the colour banding problem is concerned, I too tried a few other things first before turning to the dodge and burn tools and using them on the red and blue channels. Ideally I would have wanted to use a mask for each of the annoying colour band patterns and use them to remove the colour bands by using them in combination with a colour adjustment layer. Unfortunately I was not able to find a quick enough way to create a mask for each banding pattern so I abandoned that idea. |
|

|

|
| The Following 6 Users Say Thank You to zorin For This Useful Post: |
|
May 4th, 2014, 02:07 PM
|
#22 | |
|
Vintage Member
Join Date: Jan 2008
Posts: 1,174
Thanks: 9,103
Thanked 68,462 Times in 1,177 Posts
|
Quote:
Nor do I think the scan problem the last website describes is the cause because it deals with a straight band whereas the colour banding in beutelwolf's image are circular. Instead I believe the problem is caused by a phenomenon known as Newton's rings which can occur when light is reflected between a spherical surface (your scanner's lens assembly) and an adjacent flat surface (the glass plate on which your image lies). If you take a look at the wikipedia article on Newton's rings here the second image on the page looks a lot like the pattern which is visible in the red and blue channel of the image. Still looking for a decent way to get rid of it more quickly though. |
|
|
|
|
| The Following 6 Users Say Thank You to zorin For This Useful Post: |
|
May 4th, 2014, 04:00 PM
|
#23 | |
|
paludicolous paravant

Join Date: Sep 2005
Location: Perfidious Albion
Posts: 26,742
Thanks: 75,696
Thanked 745,884 Times in 26,862 Posts
|
   Regarding speculation about the cause, I put here a few more images from the same source (a particular ebay seller) that show similar poor scanning results. I somehow doubt this is a light reflection issue... One theory I have is that patterns present (on closer look) in the original print can cause problems - possibly that the scanner in one section scan between ink spots, and in the next section scans the ink spots. Certain originals are a right pain to scan well. One example is this: Quote:
|
|
|
|
|
| The Following 7 Users Say Thank You to beutelwolf For This Useful Post: |
|
May 4th, 2014, 04:42 PM
|
#24 |
|
paludicolous paravant
Join Date: Sep 2005
Location: Perfidious Albion
Posts: 26,742
Thanks: 75,696
Thanked 745,884 Times in 26,862 Posts
|
I happen to own one of the lobby cards so dreadfully scanned by that ebay seller.
I scanned it at different resolutions, the results (uncompressed except for the bmp->jpg conversion) are as follows:     The first image is a 100dpi scan - this was also negatively affected by the jpg compression. The second is a 150dpi scan. Stripes are still there, and show in the jpg very similarly to the bmp. The third is a 200dpi scan, and in this case the stripes are pretty much gone. The last image is a small snippet from a 600dpi scan (a snippet because the full image is 12MB), and here you can see the granularity of the print. |
|
|
|
| The Following 7 Users Say Thank You to beutelwolf For This Useful Post: |
|
May 8th, 2014, 02:03 AM
|
#25 |
|
Former Staff

Join Date: Jan 2007
Location: The Burren, Eireann
Posts: 4,364
Thanks: 23,645
Thanked 59,851 Times in 4,188 Posts
|
At one time, Polaroid offered a free dust and scratch removal tool. It is still available through the wayback machine. YMMV, but I have found with certain types of images (speckled and stippled type) it works wonders. Obviously, its usefulness will vary based upon your image properties but its another toolkit in your bag. It appears to work on all versions of Windows.
Link here: http://web.archive.org/web/200710150...sr/pdsr1_0.exe |
|
|
|
| The Following 6 Users Say Thank You to burpman For This Useful Post: |
|
May 10th, 2014, 02:18 PM
|
#26 |
|
Vintage Member
Join Date: Jan 2008
Posts: 1,174
Thanks: 9,103
Thanked 68,462 Times in 1,177 Posts
|
Came across this image of Amanda Cass recently
 and decided to repair it. This is the result :  How to get from original to edited version may be of interest to the readers of this thread so here is a short description (in 2 parts) of how it was done using photoshop cs5 : After colour correction via a curves adjustment layer the original background layer was copied to a new layer on which the creases were repaired using content-aware fill and healing brush. Creases, scratches and other damage can be quickly repaired with the content-aware fill by entering the quickmask mode and simply painting over the creases with black (shown as red on the screen) using a small brush ( size between 8 or 10 pixels ) and hardness set to 0%. 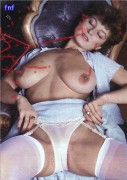 When all creases have been painted over quickmask mode is exited which turns the mask into a selection in which all previously painted over image areas are excluded from the total selection. The selection is then inverted (Select->Inverse) so it contains the creases only.  To use content-aware fill you must first select a selection tool ( I usually select the lasso tool ) and then right click on the image to open the tool's context menu and select "Fill...". In the Fill dialog box set contents to use Content-Aware with blending mode set to normal and opacity set to 100% and click OK. 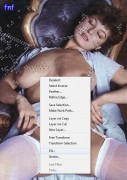 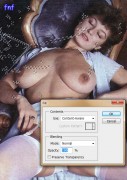 Content-aware fill generally does an amazingly good job seamlessly repairing damaged areas but there are situations where it tends to choose the wrong image area to take its repair data from. If this happens simply open the history palette ( Window->History ) and go back to the last step before exiting quickmask mode. This takes you back into quickmask mode and allows you to change the painted over areas by painting over them with the brush colour set to white. Long creases or scratches are sometimes better repairable with content-aware fill by selecting them in sections instead of one single selection. Areas in which content-aware fill did not result in acceptable results were manually repaired using the healing brush. The repaired image looked like this :  |
|
|
|
| The Following 6 Users Say Thank You to zorin For This Useful Post: |
|
May 10th, 2014, 02:19 PM
|
#27 |
|
Vintage Member
Join Date: Jan 2008
Posts: 1,174
Thanks: 9,103
Thanked 68,462 Times in 1,177 Posts
|
The previously repaired image
still has two problem areas : Amanda's head and especially the hair seem to be glued to the back of the chair because the image area is a bit too dark there and the reflection areas in the skin and white garments because the image is too bight there. Darkening of reflections or too bright areas was done by copying the repair layer to a new layer and setting its blend mode to multiply and its opacity to 50%. This produced an image in which the over- exposed image areas were more toned down. A layer mask was then applied to this layer filled completely with black ( effectively switching off the entire layer ). A soft white paint brush ( opacity set to 15% and hardness set to 0% ) was then used to paint grey/white into the layer mask in the areas where the layer should show through in order to only tone down the reflection areas of the underlying (repair)layer. This resulted in the following image :  To selectively brighten up Amanda's head and hair a rough selection was made of her head and the area around it. This selection was then copied to a new layer. This layer was then brightened by adjusting the shadows and highlights (Image->Adjustments->Shadows/Highlights). Setting both shadows and highlights amount to 10% produced the results I found best. Again a completely black layer mask was then applied to this layer and the areas which needed to show through were painted over with a soft white brush ( opacity 100%, hardness 0% ). In all the entire repair operation took about an hour to complete. NB Darkening of an image's areas which are too bright can of course also be done with the burn tool but this tool is "destructive" meaning that the original image data is permanently altered. If you've darkened an area too much you can do one of two things : start over or brighten it again using the dodge tool. However using the dodge and burn tools alternately on an image area generally results in a badly coloured area. Using a blended layer with a layer mask has the advantage of being completely non-destructive. The layer mask is the only thing being altered and can be adjusted and tweaked to one's heart's content. If there's an interest I can make the resulting psd file available. Just send me a PM. |
|
|
|
| The Following 5 Users Say Thank You to zorin For This Useful Post: |
|
May 19th, 2014, 08:35 PM
|
#28 | |
|
Vintage Member

Join Date: Jun 2008
Location: Underground in the Mountains of Madness
Posts: 2,790
Thanks: 1,012
Thanked 97,001 Times in 2,804 Posts
|
Quote:
Original Repaired:  Repair Enhanced  These results were obtained using the clone brush, the small repair heal tool, and the lighten and blur tools. For the enhancement I adjust brightness and colours on a copy - comparing against original repair, until I am happy I have made an 'improvement' (remaining very conscious that its a subjective opinion thing, which I why I offer the original as well). I rely almost entirely on eye and patience. I expand the pictures up 300% or 400% and then go over it section by section. Occasionally I reduce size to confirm results look OK then resize up again. In many ways, my 'technique' if I can call it that, is as hard as Zorin's technical approach for anyone else to follow, as it is so subjective. It's interesting to note how all the 'repairs', do not end up with the same final images. All of which just goes to show how subjective all the techniques are. So I would like to publically thank Zorin, for giving such a full explanation of the proper techniques to do these tasks. Any visitor to this thread will now be able to approach a repair using a photo editor such as Photoshop, Paint Shop Pro and the free GIMP, with some confidence. But I will add one note of caution.... practise makes perfect. There is no one stop magic fix, even though some tools offer a quick fix button. These won't clean or repair damaged areas etc .. in the end practicing with the tools can get some great results. Cheers VK |
|
|
|
|
| The Following 7 Users Say Thank You to VintageKell For This Useful Post: |
|
June 16th, 2014, 01:28 PM
|
#29 | |
|
Vintage Member
Join Date: Jan 2008
Posts: 1,174
Thanks: 9,103
Thanked 68,462 Times in 1,177 Posts
|
Quote:
I usually do this sort of thing in photoshop with the crop tool set to perspective crop which automatically performs the perspective transformation but decided to give it a go with Gimp instead so this type of repair can be done by anybody willing to download the free Gimp and spend some time to get to grips with it ( like any image editor Gimp has a learning curve ). Incidentally, Gimp generally starts up in floating window mode after it is first installed. On a single monitor I prefer to work in single window mode. To switch Gimp to single window mode click on the Windows option on the Gimp main menu and select 'Single-Window mode'. 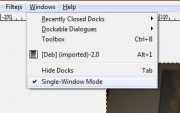 Load the picture into Gimp either by dragging and dropping or via File->Open (Ctrl+O) and select the Perspective tool in the tools palette (or Shift+P). When selecting the perspective tool from the tools palette you need to click on the image in order to activate the perspective grid, Shift+P automatically activates the perspective grid on the currently active image.  To correct the perspective of the loaded picture you need to set the tool's Direction option (in the Tool Option palette) to Corrective and then drag the corners of the perspective grid to the spot where you want the corners of the resulting image to be. 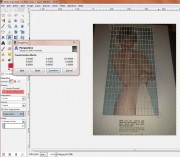 When the drag corners are placed where you want them to be click the Transform button in the tool's floating window to perform the perspective transformation. 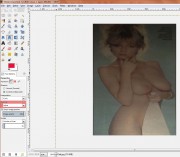 It appears that Gimp resizes the resulting image layer to fit the original image's dimensions. If you don't want that to happen first crop the image to only contain the area you want to transform. 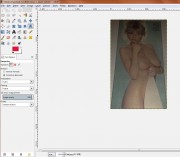 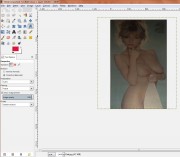 Looking at the vertical border lines it is clear that the original image also has some vertical distortion but it is so small that it is easier to crop the resulting image to exclude the original border than to use the cage distortion tool to correct this. 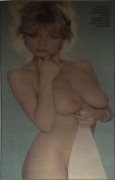 The image is now ready for further colour and brightness adjustment. Naturally I wanted to compare the Gimp result with the Photoshop result and it came as a bit of a surprise to find that the 2 images are vastly different. 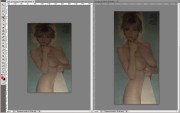 On the left is the Gimp result and right the Photoshop result. Photoshop clearly tries to maintain more of the aspect ratio of the original area selected for transformation which, when compared to the Gimp image, results in a taller image. Without access to the original paper clipping it is impossible to determine which of the two is closest to reality. NB. Unlike other image editors I know, Gimp 2's File->Save command saves the image in Gimp's native image format only. In order to save the image in any other format you have to choose File->Export. Last edited by zorin; June 17th, 2014 at 07:44 AM.. |
|
|
|
|
| The Following 5 Users Say Thank You to zorin For This Useful Post: |
|
December 1st, 2015, 10:49 PM
|
#30 | |
|
Moderator

Join Date: Jul 2007
Location: Upper left corner
Posts: 7,214
Thanks: 48,029
Thanked 83,539 Times in 7,208 Posts
|
Quote:
|
|
|
|
|
| The Following 2 Users Say Thank You to deepsepia For This Useful Post: |
|
|
|


 Linear Mode

