 |
 |
 |
|
 Register on the forum now to remove ALL ads + popups + get access to tons of hidden content for members only!
|
||||||||
|
||||||||
 Best Porn Sites Best Porn Sites
|
Live Sex | Register | FAQ | Members List | Calendar | Mark Forums Read |
 |
|
|
Thread Tools | Display Modes |
 July 10th, 2010, 08:31 PM
|
#1 |
|
Vintage Member
Join Date: Jul 2010
Posts: 823
Thanks: 20
Thanked 24,261 Times in 822 Posts
  |
I decided to start this thread with the idea that everyone here who scans, probably has some tips that they learned that they could share with others. The idea is that the better people are at scanning, the better the pictures will be that we download. This was how I learned to scan....with the help of other scanners.
 So, if anyone would care to share some of their tips and techniques, this is the place to do it. One of the first tips I got was to de-screen your scans if you scanned from magazines. My first scanner had a de-screen function, but you had to manually set it up, and it took a long time to get the correct lpi set. The newer flatbed scanners have this de-screen function, only now you just turn it on. It does everything else itself. If you don't de-screen a scan from a magazine, you will get lines running across the picture, or a crosshatch pattern. This is called moire, and it results from the half tone printing process that printers use. If you scan an actual photograph, you don't need to de-screen it because it has a continuous emulsion, not half toning. You only need to use the de-screen function for the printed page. |

|

|
| The Following 28 Users Say Thank You to Dekoda For This Useful Post: |
|
|
|
July 11th, 2010, 03:47 AM
|
#2 |
|
Vintage Member
Join Date: Jul 2010
Posts: 823
Thanks: 20
Thanked 24,261 Times in 822 Posts
|
Here's another tip. If you need to scan a picture that is bigger than your scanner can handle and you need to do two scans, then stitch them together, here's a tip that will save you time.
The scanner's light bulb doesn't have the same uniform brightness across it. That means that one side of the bulb will be brighter than the other side. If you were to simply scan one part of the picture, then slide the picture over to scan the rest of it, the two halves of the picture won't match up in brightness when you try to stitch it together. Let's say that you want to scan a centerfold from a magazine. The centerfold is the center page of the magazine, so it is one long piece of paper. Let's call one edge of the centerfold side A, the middle where the fold is, we'll call side B, and the other edge of the centerfold we'll call side C. Okay, place the paper on the scanner so that you will be scanning one edge (side A) and the middle (side B). Let's say that side A is on the left side of the scanner's glass, and side B is on the right side of the scanner's glass. Once you've scanned this half of the centerfold, rotate the page 180 degrees so that it is upside down. Now, you place edge C of the centerfold on the left side of the scanner, and that leaves side B (the middle of the centerfold) on the right side of the scanner....the same side it was on in the first scan. Once you've made the scan, you will rotate the second scan 180 degrees so that it is properly oriented with the first scan. When you put the two scans together to stitch them, the middle sections (side B) will have the same brightness and you won't need to make any adjustments to the brightness to get them to match up. If you don't rotate the centerfold, what happens is that edge A of the centerfold is placed on the left side of the scanner and side B (the middle) is placed against the right side of the scanner. If the light bulb in the scanner is brighter on one side....say the right side....then the scan will have side B (the middle) brighter than the left side. When you make the second scan, if you just slid the picture over so that side B (the middle) was on the left side of the scanner, and edge C was on the right side of the scanner, what you'd get would be that side B (the middle) is now on the darker side of the light bulb. When you went to try and stitch the two halves together, you'd be placing the first scan, which had the brighter side of the light bulb on the B side, against the second scan, which had the darker side of the light bulb against the B side. The end result would be two mismatched brightness levels. Rotating the picture 180 degrees for the second scan would eliminate that. |
|
|
|
| The Following 33 Users Say Thank You to Dekoda For This Useful Post: | blenheim, Clark Kent, croitear, Darth Joules, dbailey, deezer, diggy242, effCup, electrofreak, Ernesto75, guibao, haVEFun here, howerd, Janson, jazzsilk, Jism Jim, jomama, kckid42, krixxx, lmcgillet, LowerCrack, Moltar, NearDark, NIN, Numerous One, Ocracoke, pardonmeboy, Pepper II, shatley, delicasalat, taarakond, tink1974, zxmar05 |
|
July 11th, 2010, 03:56 AM
|
#3 |
|
Senior Member

Join Date: Aug 2009
Location: somewhere between here & there
Posts: 164
Thanks: 268
Thanked 10,702 Times in 156 Posts
|
Also, scanning at 300dpi is plenty to make excellent scans.
|
|
|
|
|
July 11th, 2010, 04:40 AM
|
#4 |
|
Vintage Member
Join Date: Jul 2010
Posts: 823
Thanks: 20
Thanked 24,261 Times in 822 Posts
|
Another tip....never use the sharpen filter on a scan. Instead, use the "Unsharpen Mask". If you are using Photoshop, set the Radius to .3, the Threshold to 8, then move the slider up till you get the desired sharpness.
Okay, now, if you are using Photoshop, once you have finished editing the picture, use the sharpen tool to accent certain features to make the picture look sharper than it really is. I set the strength to 30%, and use a brush that is small....maybe 15 pixels, and I use a hard brush. I will apply this brush to the model's eyes, hair, nose, lips, teeth, nipples, belly button, any jewelry she's wearing, fingers, toes, and her vagina. By doing this, it will make the picture look sharp. |
|
|
|
|
July 11th, 2010, 06:29 AM
|
#5 |
|
Senior Member
Join Date: Apr 2009
Posts: 354
Thanks: 6,468
Thanked 1,980 Times in 313 Posts
|
To prevent bleed through from the printing on the backside of the page, place a black sheet of paper behind the page you are scanning. I never use a de-screening filter as this only blurs the image. I scan at 300 ppi at 100% of the actual size and then change the size of the scan to be slightly smaller physically but retain the 300 ppi aspect. I always save the image as a JPEG without any compression-- always maximum quality (12) and the "baseline" setting in Photoshop. I always see a lot of images available here with too much compression because some people don't know any better.
|
|
|
|
|
July 11th, 2010, 06:57 AM
|
#6 | |
|
Vintage Member
Join Date: Jul 2010
Posts: 823
Thanks: 20
Thanked 24,261 Times in 822 Posts
|
Quote:
Photoshop does a poor job when it comes to jpeg sizes. They have a 1 to 12 scale, while most other programs have a 1 to 100 scale. If you use PS to save an image in jpeg format, a 9 is the best number to use. Anything over that will just make a bigger filesize, but won't result in a better image. If you save the image with a setting of 12, then compare it to a setting of 9....there will be no visible difference. There is a reason for this. The better way to save a jpeg is with a program that uses the 1 to 100 jpeg settings. With a program like that, I use a setting of 85. This is called the "Q" or quality. This is derived from the five factors of an image.....the red, blue, green, chrominance, and luminance of the picture. When you save a jpeg, you are compressing the image. That means that you are throwing away some of the information in the picture. You can eliminate the chrominance and the luminance, since they are a product of the brightness of the colors in the picture. The chrominance and luminance make up 20% of the picture, so if you eliminate that, you are left with 80% of the information in the picture. To play it safe, I add an extra 5% of the information, making it 85% or a quality of 85. Anything over that will not be visible in the picture. Saving it at a 12 in Photoshop will not yield any benefits over saving it as a 9. I agree that using the descreen function will result in a softer picture, but you can regain that sharpness in PS by using the unsharpen mask. If you don't use the descreen function, you will get moire, and that is hard to eliminate. I also use a black background to eliminate the bleed through that you find in some magazines. I use a black foam board, but any black paper or cardboard will work. I appreciate the tips ellias. All input is welcome. Last edited by Dekoda; July 11th, 2010 at 07:10 AM.. |
|
|
|
|
|
July 13th, 2010, 09:56 AM
|
#7 |
|
Vintage Member
Join Date: Jul 2010
Posts: 823
Thanks: 20
Thanked 24,261 Times in 822 Posts
|
Another tip....I read in an earlier post in another thread where someone said that it was difficult to align two halves of a picture when you had to scan one half, then scan the second half and join them together, like a centerfold. With Photoshop, it's not hard at all to join the two halves.
First, scan the two halves of the picture that you are going to join together. Remember to scan the first half of the picture, then rotate the second half of the picture 180 degrees and scan that. In my example, I used a centerfold, but you need to do the same thing even if the two halves are on different pages and not connected together like the centerfold is. (see image 1) In the first picture, you can see the two halves of the picture, and they are turned 180 degrees from each other. Now rotate one of them 180 degrees so that they are facing the same direction, then select the Measure Tool from the toolbar. If you don't see the Measure Tool, it's in the flyout menu of the eyedropper. Just click and hold on the eyedropper and you will see the Measure Tool. (see image 2) To use the measure tool, locate the line that runs down the centerfold where it was folded. You don't need to see the whole line, just part of it. You might need to zoom in to see it. Okay, now place the Measure Tool somewhere along the line, click and hold the Measure Tool at that spot to anchor it, then drag it along the line to a place further long the line, then let go of the Measure tool. This will create a highlighted line along the center line of the picture.(see image 3) Now, go to Image-Rotate Canvas and click on Arbitrary. In the window that pops up, you will see that the angle and direction are already selected. This is what the Measure tool does. Just click Ok and the picture will rotate the exact amount you need to make it straight. Now do the same thing to the other half. You will now have the two halves perfectly aligned so that you can stitch them.    |
|
|
|
|
July 13th, 2010, 11:08 AM
|
#8 |
|
Vintage Member
Join Date: Jul 2010
Posts: 823
Thanks: 20
Thanked 24,261 Times in 822 Posts
|
I decided to make a second post describing the stitching, since there is a bad storm here right now and I've lost power three times.(thank God for uninterruptible power supplies, but my modem isn't connected to my UPS).
Okay, to make for a better stitch, crop the two halves. I like to crop them so that the line that runs down the center of the centerfold, and is visible in each half, will still be visible in each half, but not by much. At this point, you are only interested in cutting off the excess that is near that line. Don't worry about the other edges of the scans.(see image 4) You can see that I didn't crop the picture right along that center line, I left a little bit of excess. I also didn't crop anything off the other sides yet. I'll do that after I've merged the two halves. Okay, so now select one of the scans and enlarge the canvas. You'll notice that in the Canvas Size window, the Current width is 8.107 inches. I usually double that to allow me some room to work. Also, in the Anchor section I click on where this side is going to be placed. (see image 5). I now have doubled the size of one the scans, in my case, it's the bottom side. Okay, now I click on the other scan, the top side, so as to select it, then I do a Control + A to select the entire picture, then do a Control + C to copy it. I then click on the bottom half of the picture to select it, then I do a Control + V and this will paste the top half into a separate layer onto the bottom half. (see image 6). With the top layer selected, select the Move Tool, then click and hold the top side of the picture, and drag it close to where it's aligned. Once you've got the two sides close to being aligned, release the Move tool, and use the arrow keys to make more exacting movements. Zoom in to get a better view. (see image 7) Once you've got the two sides aligned, the next step is to match up the colors if they are off. Since this was a one page centerfold, the colors are pretty close. The only mismatch is where the edge of the paper was hanging over the edge of the scanner. When this happens, it creates a slightly darker area right where the paper rose up off the scanner's glass and fell over the side. If you scanned two separate pages, you would have one page that mismatched with the color on the second page. While it takes a bit to get the colors to match, by having one side of the picture on it's own layer, makes it a lot easier to work on that side of the picture. Since I used a centerfold that spanned one piece of paper, the colors are close so I can now merge the layers and flatten the image. If I didn't flatten the image, I couldn't clone from one side of the image to the other. I need to flatten the image first. Once I've done that, I can use the clone tool and the healing brush to remove that mismatched color line running along the middle. After I've done that, I can rotate the picture, then crop off the edges.(see image 8). At this point, everyone adjusts their images differently to get the colors they want. If anyone is interested in that, that will be in the next post below this one, since I don't know how many images I might need to post, and I've already posted 5 to this post.  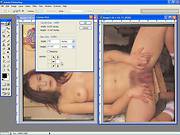    Last edited by Dekoda; August 1st, 2010 at 09:05 PM.. |
|
|
|
|
July 13th, 2010, 11:44 AM
|
#9 |
|
Vintage Member
Join Date: Jul 2010
Posts: 823
Thanks: 20
Thanked 24,261 Times in 822 Posts
|
Okay, what I do now is to use the ROC filter to remove the reddish color cast. As you will see, the filter removes too much color, but that's okay, I'll just fade that effect. In image 9, you see how washed out the filter makes the image. I'll now reduce it's effect by using the fade function. (see image 10).
Next I'll adjust the levels. (image 11). I'd like a bit more contrast, so I'll increase that. (image 12). Then I'll add a bit more color by increasing the saturation. (image 13) Now I'll clean up any spots or blemishes on the picture, I'll resize it, then I'll sharpen it. Last, I'll use the Sharpen tool to sharpen certain areas on her body, and that's it. The picture is finished. (image 14). The actual size finished version is image 15. 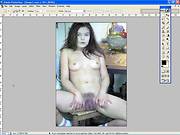      Last edited by Dekoda; July 13th, 2010 at 12:00 PM.. |
|
|
|
|
July 13th, 2010, 08:43 PM
|
#10 | |
|
Veteran Member
Join Date: Aug 2007
Posts: 566
Thanks: 192
Thanked 12,244 Times in 432 Posts
|
Quote:
(Source the JPEG FAQ). JPEG is "lossy," meaning that the decompressed image isn't quite the same as the one you started with. JPEG is designed to exploit known limitations of the human eye, notably the fact that small color changes are perceived less accurately than small changes in brightness. ---------------------------------------------------- JPEG defines a "baseline" lossy algorithm, here's the outline of the baseline compression algorithm: 1. Transform the image into a suitable color space. This is a no-op for grayscale, but for color images you generally want to transform RGB into a luminance/chrominance color space (YCbCr, YUV, etc). The luminance component is grayscale and the other two axes are color information. The reason for doing this is that you can afford to lose a lot more information in the chrominance components than you can in the luminance component: the human eye is not as sensitive to high-frequency chroma info as it is to high-frequency luminance. 2. (Optional) Downsample each component by averaging together groups of pixels. The luminance component is left at full resolution, while the chroma components are often reduced 2:1 horizontally and either 2:1 or 1:1 (no change) vertically. This step immediately reduces the data volume by one-half or one-third. In numerical terms it is highly lossy, but for most images it has almost no impact on perceived quality, because of the eye's poorer resolution for chroma info. 3. Group the pixel values for each component into 8x8 blocks. Transform each 8x8 block through a discrete cosine transform (DCT). Thus you now have numbers representing the average value in each block and successively higher-frequency changes within the block. The motivation for doing this is that you can now throw away high-frequency information without affecting low-frequency information. 4. In each block, divide each of the 64 frequency components by a separate "quantization coefficient", and round the results to integers. This is the fundamental information-losing step. The larger the quantization coefficients, the more data is discarded. 5. Encode the reduced coefficients using either Huffman or arithmetic coding. Notice that this step is lossless, so it doesn't affect image quality. 6. Tack on appropriate headers, etc, and output the result. In a normal "interchange" JPEG file, all of the compression parameters are included in the headers so that the decompressor can reverse the process. These parameters include the quantization tables and the Huffman coding tables. The decompression algorithm reverses this process. ----------------------------------------------------- Most JPEG compressors let you pick a file size vs. image quality tradeoff by selecting a quality setting. There seems to be widespread confusion about the meaning of these settings. "Quality 95" does NOT mean "keep 95% of the information", as some have claimed. The quality scale is purely arbitrary; it's not a percentage of anything. In fact, quality scales aren't even standardized across JPEG programs. Adobe Photoshop doesn't use a numeric scale at all, it just gives you Low/Medium/High/Maximum choices. In most cases the user's goal is to pick the lowest quality setting, or smallest file size, that decompresses into an image indistinguishable from the original. This setting will vary from one image to another and from one observer to another, but here are some rules of thumb. For good-quality, full-color source images, the default IJG quality setting (Q 75) is very often the best choice. This setting is about the lowest you can go without expecting to see defects in a typical image. Try Q 75 first; if you see defects, then go up. If the image was less than perfect quality to begin with, you might be able to drop down to Q 50 without objectionable degradation. On the other hand, you might need to go to a *higher* quality setting to avoid further loss. This is often necessary if the image contains dithering or moire patterns. Except for experimental purposes, never go above about Q 95; using Q 100 will produce a file two or three times as large as Q 95, but of hardly any better quality. Q 100 is a mathematical limit rather than a useful setting. If you see a file made with Q 100, it's a pretty sure sign that the maker didn't know what he/she was doing. Adobe Photoshop automatically switches off chroma downsampling at its higher quality settings, that's why the bigger file size. ================================================== ===== JPEG Test with Photoshop 4 Photoshop Jpeg Options Quality: 00 Q62 Low - small file 01 Q66 02 Q70 03 Q75 Medium 04 Q77 05 Q81 06 Q84 High 07 Q88 08 Q92 Maximum - large file 09 Q95 10 Q98 Quality vs File size: Sample: 1266x1788, JPEG size 150K, size when opened 6.48M 00 Q62 92k Low - small file 01 Q66 107k 02 Q70 122k 03 Q75 142k Medium 04 Q77 179k 05 Q81 199k 06 Q84 258k High 07 Q88 338k 08 Q92 505k Maximum - large file 09 Q95 863k 10 Q98 1750k Comments: 1. Photoshop 4 uses a Quality scale between 0-10 (not 12) 2. I've got the Q values from the saved files via Jpeg Group's jpeg test program 3. The recommended Q75 value is at 03 (Medium) 4. Dekoda's recommended Q85 value is at 06-07 (High) 5. Those people who post files saved with Q100 "don't know what they are doing" Tuffy |
|
|
|
|
|
| Thread Tools | |
| Display Modes | |
|
|


 Linear Mode

