Its all very well when your original magazine or book is printed on good quality paper with decent inks, but many of the low budget and early editions of titles from the 70s and early 80s were produced using generic inks and printed on cheap paper stock to cut costs. So how do you get the best possible results from low quality source media?
My day job involves working with graphics all the time, and having recently started collecting hard copies of adult magazines, Im keen to preserve them so that when I want to look at them I dont have to pull out the actual paper copy. So I spent a few weeks experimenting with different scanning techniques, so the image quality is as clear as possible. This, combined with the fact Im already familiar with Adobe Photoshop, means that I now think Ive come up with a short list of golden rule tips, which I thought Id share here.
You dont need to be a professional graphic artist to reproduce these tips on your own scans, but it does help if you have a good quality scanner, which is free from dust, and fairly fast PC or Mac. You can grab a copy of Adobe Photoshop Version 2 completely free from Adobe.com if you cant afford to buy the latest version of CS6, and there are also alternative image editors out there with similar features to Photoshop, such as GIMP, which is completely free, and available for Linux, Mac and Windows.
Firstly youre going to want to turn off as many of the built-in tools which come with your scanners software as you can, because these tend to be pre-configured for scanning glossy photographs and text only documents, rather than CMYK screen printed magazines. Some scanner software have options for Descreening images from magazines, which works by sampling each pixel and comparing it to the next pixel immediately adjacent to it, so that a general map of the image can be stored in the image table. This is fine for images which are already fairly sharp and up to resolutions of 600 Dots Per Inch (DPI) automatic descreening works fairly well.
But with lower quality source media descreening can actually blur the image even more once its converted to JPEG. The reason for this is firstly to do with the way magazines are printed, which is a four stage process known as CMYK (Cyan, Magenta, Yellow and Key) screen printing. Each time the paper passes through the printing press the ink dots land in a slightly different place, so when you merge them all together by descreening you can introduce an effect which looks as if the red ink hues are misaligned with the rest of the image. What we really need to be able to do, rather than descreen the whole image in one pass, is blend the individual CMYK colours together individually and effectively descreen the image by hand.
So turn off descreening in your scanners settings, and scan an image at 2400 DPI. Youll also want to turn off any other automatic image correction settings in your scanners software settings so that youre only scanning whats on the page rather than what the scanner thinks your image should look like mathematically. Some auto-correct settings work by sampling the whitest available colour on the page, when you do a preview scan, and when you do the main scan it adjusts the value of the Red Green and Blue channels by a value which corresponds to the difference between what they are sampled at by the read head on your scanner and the value of white which it scanned in the preview pass. This can wash out a lot of detail and leave the image looking flat.
Youre also going to want to set the image file type which your scanner software saves to the computer to the highest possible setting. Some scanner manufacturers provide a lot of options in this area, but some are limited to JPEG and PDF. You want to choose either RAW, TIFF, or PICT. Im going to use TIFF in this example. Make sure that in the TIFF options the compression type is set to Macintosh (even if youre on a Windows or Linux computer) and any compression settings youre offered are set to off. You might also have the option to embed an ICC colour profile, if so turn this option on.
If your scanner software only allows you to save JPEG file types make sure its set to the highest possible quality settings (i.e., the lowest possible compression) and that the JPEG type is set to Progressive Scan 3.
If you also have options for the type of colour profile, make sure its set to Adobe, because this will allow Photoshop to read more information in the colour table later on. Some scanner software also includes a colour profile named after the brand name of your scanner, but these tend to be simplified pallets designed to match the inks used by the printer, if you have a scanner which is also a fax / copier.
Once your 2400 DPI image is scanned, and saved as a TIFF file to your computer, open it in Photoshop. When the image first opens, so that it fits onto the computer monitor, Photoshop may resize it, but when you view it at 100% size, using the View menu (View actual Size) you should see something like this:
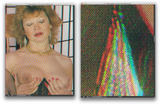
On the left is the image at 7% of original size, and on the right is the same image at 100% actual size. Youll notice that instead of each dot of ink being merged into one another, as is the case when you enable automatic descreening in your scanning software, each colour is now visible as an individual pattern. This means that we can move around each of the colours which are misaligned (or noticeable only because the source media is low resolution) until they line up and create a sharper image. It is possible to do this in Photoshop with an image which has been automatically descreened as well, but its harder to see individual colours and most consumer grade scanners dont allow descreening to be turned on for image resolutions above 600 DPI.
Now, in the menu named Window, find an item called Channels. In here you can see that all three channels Red, Green and Blue can be individually selected. When you click on Red Photoshop will show only the red colour channels in your image. Click the Eye icon next to RGB at the top of the Channels panel, and your image will once again show all three colour channels combined, but this time only the Red channel is selected.
Now, with the Move Tool selected (keyboard shortcut key V) you can use the arrow keys on your keyboard to nudge around the Red channel so that it lines up with the Green and the Blue. You should zoom out of the image to view it at Fit to Screen size now and then to check youre heading towards a sharper image. You can do this using the Plus and Minus keys on the keyboard, or on the Apple Mac OS X version by using the shortcut key Alt + Command + 0 (zero) to zoom in 100% and Command + 0 (zero) to zoom out. I dont know what the keyboard shortcut is for the Windows version of Photoshop, but its probably the same as Mac.
You can repeat this process for the Green and then the Blue colour channels, but you should also notice that sometimes an image is only blurred because when it was being printed only one of the colour passes was misaligned, and that the other four are perfectly fine. This varies according to each particular image being processed, but generally speaking you can improve an image by only working with one channel and it is usually Red.
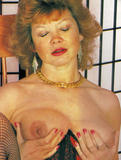
Once each individual colour channel is aligned to the other, your image should look a lot sharper:
But to sharpen things up even more we need to merge all the individual pixels into one colour table, in the same way the scanner software works when it automatically descreens. To do this, first make sure that you select all of the colour channels in the Channels panel, by clicking on the top RGB pane, which automatically selects the Red Green and Blue channels below it.
Then view your image at 100% full size and go to the Filters Menu, and choose Filters > Noise > Median. Make sure the button marked Preview is turned on, because you now want to choose the best possible value for merging all the individual colour dots into one smooth descreen. You could use the slider at the bottom, but this tends to be a little hit and miss. Instead choose a value by hitting the number keys on the keyboard. I chose a Radius value of 13, but you might need one lower or higher.
To preview how the various Radius values affect the image, you can use the keyboard shortcut keys mentioned earlier to zoom into 100% size and zoom out to Fit image to Screen size. Once your image is sharp both up-close and at regular viewing size, hit OK and wait for Photoshop to apply the Median filter to the whole image.
Bingo! Your image is now restored. At this point you could also try using a few different settings in the Unsharp Mask filter, to really get certain details to pop out. Its also sometimes a good idea to adjust the Shadows and Highlights pallet, in the Image > Adjustment menu, so that shades close to black move up towards white. This can give the illusion of having greater image sharpness than is actually present, by evenning out certain unused colours, but its important to be sparing with how you do this, otherwise yellow and red tones can become over saturated.
You could at this point save your image as it is, but the file size will be very large and so unsuitable for uploading to most image hosting websites which have a file size limit. So were now going to save the image as a JPEG, with an easier to manage file size.
In Photoshops Image menu, go to Image Size
and change the Resolution value from 2400 to between 400 and 600. You will get a preview of how wide and how tall your image will be, with these new DPI settings, shown in the Width and Height boxes at the top of the Image Size window. Once youre happy, click OK.
Now, in the File menu, choose Save As
and in the pop-up box, under Format choose JPEG. Choose a location on your hard drive to save the new image, and click Save. The JPEG options box will now ask you what compression level you want to use. If you make sure to click the box marked Preview, the zoom in and out shortcut keys used earlier will now allow you to check what effect the JPEG compression will have on your image once it is saved. Youre going to want to choose a level of compression which is as low as possible, without affecting image quality. The total size of the file once it is saved will also show underneath the Preview button. Anything under 9 Megabytes is fine for most image hosting sites, although some have a maximum file size as low as 3 MB. Once youve picked values that work for you, in the Format Options box make sure to check Progressive and set the amount of scans to 3, and hit OK.
You now have a brand spanking newly restored JPEG of an image which started out as unusably low quality. This can be a painstaking process if youre scanning a lot of images, but there are tutorials out there which show you have to write automated scripts for Photoshop, which can be used to bulk-process a folder full of images, so you dont have to manually adjust each and every one of your non-descreened scans by hand.
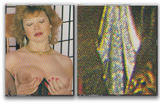
Here is another image I processed using these techniques. Notice how the automatically descreened image is considerably less sharp than the one processed manually:
Automatic:

Manual:

Naturally, the higher the resolution of your scan the longer it will take to process, but this also means you have greater and greater control of the Red Green and Blue colour channels in Photoshop, meaning the greater degree of control you have over the descreening process.
Looking forward to seeing your results. Enjoy!