I decided to make a second post describing the stitching, since there is a bad storm here right now and I've lost power three times.(thank God for uninterruptible power supplies, but my modem isn't connected to my UPS).
Okay, to make for a better stitch, crop the two halves. I like to crop them so that the line that runs down the center of the centerfold, and is visible in each half, will still be visible in each half, but not by much. At this point, you are only interested in cutting off the excess that is near that line. Don't worry about the other edges of the scans.(see image 4) You can see that I didn't crop the picture right along that center line, I left a little bit of excess. I also didn't crop anything off the other sides yet. I'll do that after I've merged the two halves.
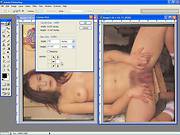
Okay, so now select one of the scans and enlarge the canvas. You'll notice that in the Canvas Size window, the Current width is 8.107 inches. I usually double that to allow me some room to work. Also, in the Anchor section I click on where this side is going to be placed. (see image 5).
I now have doubled the size of one the scans, in my case, it's the bottom side. Okay, now I click on the other scan, the top side, so as to select it, then I do a Control + A to select the entire picture, then do a Control + C to copy it. I then click on the bottom half of the picture to select it, then I do a Control + V and this will paste the top half into a separate layer onto the bottom half. (see image 6).
With the top layer selected, select the Move Tool, then click and hold the top side of the picture, and drag it close to where it's aligned. Once you've got the two sides close to being aligned, release the Move tool, and use the arrow keys to make more exacting movements. Zoom in to get a better view. (see image 7)
Once you've got the two sides aligned, the next step is to match up the colors if they are off. Since this was a one page centerfold, the colors are pretty close. The only mismatch is where the edge of the paper was hanging over the edge of the scanner. When this happens, it creates a slightly darker area right where the paper rose up off the scanner's glass and fell over the side.
If you scanned two separate pages, you would have one page that mismatched with the color on the second page. While it takes a bit to get the colors to match, by having one side of the picture on it's own layer, makes it a lot easier to work on that side of the picture.
Since I used a centerfold that spanned one piece of paper, the colors are close so I can now merge the layers and flatten the image. If I didn't flatten the image, I couldn't clone from one side of the image to the other. I need to flatten the image first. Once I've done that, I can use the clone tool and the healing brush to remove that mismatched color line running along the middle. After I've done that, I can rotate the picture, then crop off the edges.(see image 8).
At this point, everyone adjusts their images differently to get the colors they want. If anyone is interested in that, that will be in the next post below this one, since I don't know how many images I might need to post, and I've already posted 5 to this post.