The previously repaired image
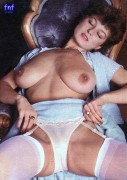
still has two problem areas : Amanda's head and especially the hair seem to be glued to the
back of the chair because the image area is a bit too dark there and the reflection areas in the skin and
white garments because the image is too bight there.
Darkening of reflections or too bright areas was done by copying the repair layer to a new layer and
setting its blend mode to multiply and its opacity to 50%. This produced an image in which the over-
exposed image areas were more toned down. A layer mask was then applied to this layer filled completely
with black ( effectively switching off the entire layer ).
A soft white paint brush ( opacity set to 15% and hardness set to 0% ) was then used to paint grey/white
into the layer mask in the areas where the layer should show through in order to only tone down the
reflection areas of the underlying (repair)layer.
This resulted in the following image :
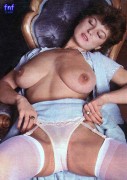
To selectively brighten up Amanda's head and hair a rough selection was made of her head and the area
around it. This selection was then copied to a new layer. This layer was then brightened by adjusting
the shadows and highlights (Image->Adjustments->Shadows/Highlights). Setting both shadows and highlights
amount to 10% produced the results I found best.
Again a completely black layer mask was then applied to this layer and the areas which needed to show
through were painted over with a soft white brush ( opacity 100%, hardness 0% ).
In all the entire repair operation took about an hour to complete.
NB
Darkening of an image's areas which are too bright can of course also be done with the burn tool but this
tool is "destructive" meaning that the original image data is permanently altered. If you've darkened an
area too much you can do one of two things : start over or brighten it again using the dodge tool.
However using the dodge and burn tools alternately on an image area generally results in a badly coloured
area.
Using a blended layer with a layer mask has the advantage of being completely non-destructive.
The layer mask is the only thing being altered and can be adjusted and tweaked to one's heart's content.
If there's an interest I can make the resulting psd file available. Just send me a PM.