Quote:
Originally Posted by VintageKell

|
I usually do this sort of thing in photoshop with the crop tool set to perspective crop
which automatically performs the perspective transformation but decided to give it a go
with Gimp instead so this type of repair can be done by anybody willing to download the
free Gimp and spend some time to get to grips with it ( like any image editor Gimp has
a learning curve ).
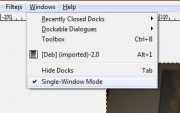
Incidentally, Gimp generally starts up in floating window mode after it is first installed.
On a single monitor I prefer to work in single window mode.
To switch Gimp to single window mode click on the Windows option on the Gimp main menu and
select 'Single-Window mode'.
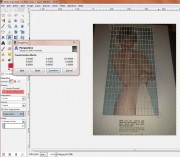
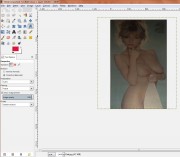
Load the picture into Gimp either by dragging and dropping or via File->Open (Ctrl+O) and
select the Perspective tool in the tools palette (or Shift+P). When selecting the perspective
tool from the tools palette you need to click on the image in order to activate the perspective
grid, Shift+P automatically activates the perspective grid on the currently active image.

To correct the perspective of the loaded picture you need to set the tool's Direction option
(in the Tool Option palette) to Corrective and then drag the corners of the perspective grid
to the spot where you want the corners of the resulting image to be.
When the drag corners are placed where you want them to be click the Transform button in the
tool's floating window to perform the perspective transformation.
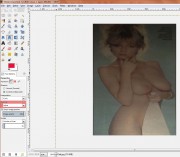
It appears that Gimp resizes the resulting image layer to fit the original image's dimensions.
If you don't want that to happen first crop the image to only contain the area you want to transform.
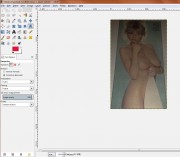
Looking at the vertical border lines it is clear that the original image also has some vertical distortion
but it is so small that it is easier to crop the resulting image to exclude the original border than to
use the cage distortion tool to correct this.
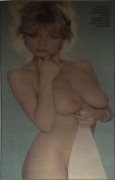
The image is now ready for further colour and brightness adjustment.
Naturally I wanted to compare the Gimp result with the Photoshop result and it came as a bit of
a surprise to find that the 2 images are vastly different.
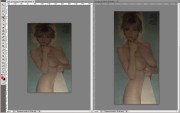
On the left is the Gimp result and right the Photoshop result. Photoshop clearly tries to maintain
more of the aspect ratio of the original area selected for transformation which, when compared to
the Gimp image, results in a taller image.
Without access to the original paper clipping it is impossible to determine which of the two is
closest to reality.
NB.
Unlike other image editors I know, Gimp 2's File->Save command
saves the image in Gimp's native
image format only.
In order to save the image in any
other format you have to choose
File->Export.